.svg)

We recently finished a large project with the Gimbal Goats team, with a lot of birds. The wing setup is always tricky, so let's share some information on how we tackled it!
Client request:
A flexible wing rig for flying as well as acting. Controllers kept to a minimum to speed up animation. Separate finger feather setup. Minimal deformation for the feather cards which drives the groom in Houdini.
Features of our solution:
- Standard IK/FK setup with bendy arms
- Lattice based setup with simple controls
- A joint based layer on top for the finger feathers
- Corrective blendshapes for an even feather spread and better feather deformation
- Controls for secondary finger feathers
- Automatic finger feather spread
- A switch to ‘fly mode’ with dynamic spring chains on the entire wing mesh
Detailed overview of the wing rig:
Initial setup
For this project we worked with mGear, I won’t be going over the specific mGear functions and components, but rather explain the custom wing setup we made.
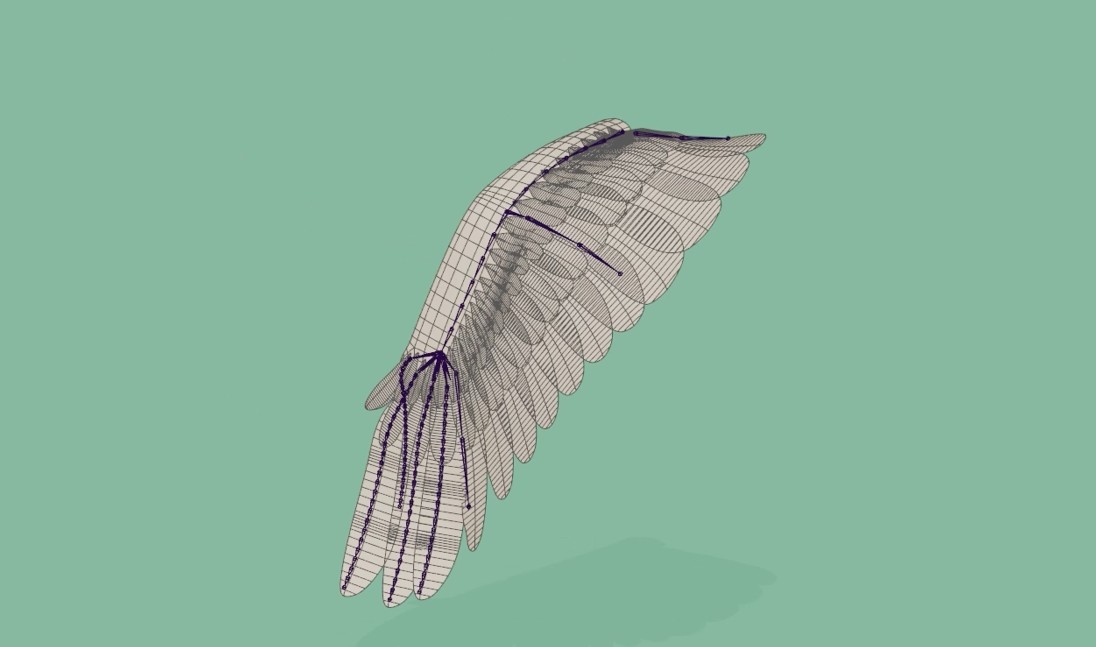
We create all the arm joints, and add an extra chain om the shoulder, elbow and wrist to control the feathers with. In the end we will create 3 FK controllers per chain and one extra to aimconstain the entire chain to. These will be the main wing controls. The elbow chain should only move 50% of the elbow rotation in order to spread the feathers nicely when the elbow bends up. (driven key/offset group/…)
Why a lattice?
The main advantage of using a lattice for a base layer is that it gives us deformation on the feathers without them clipping.
.png)
.png)
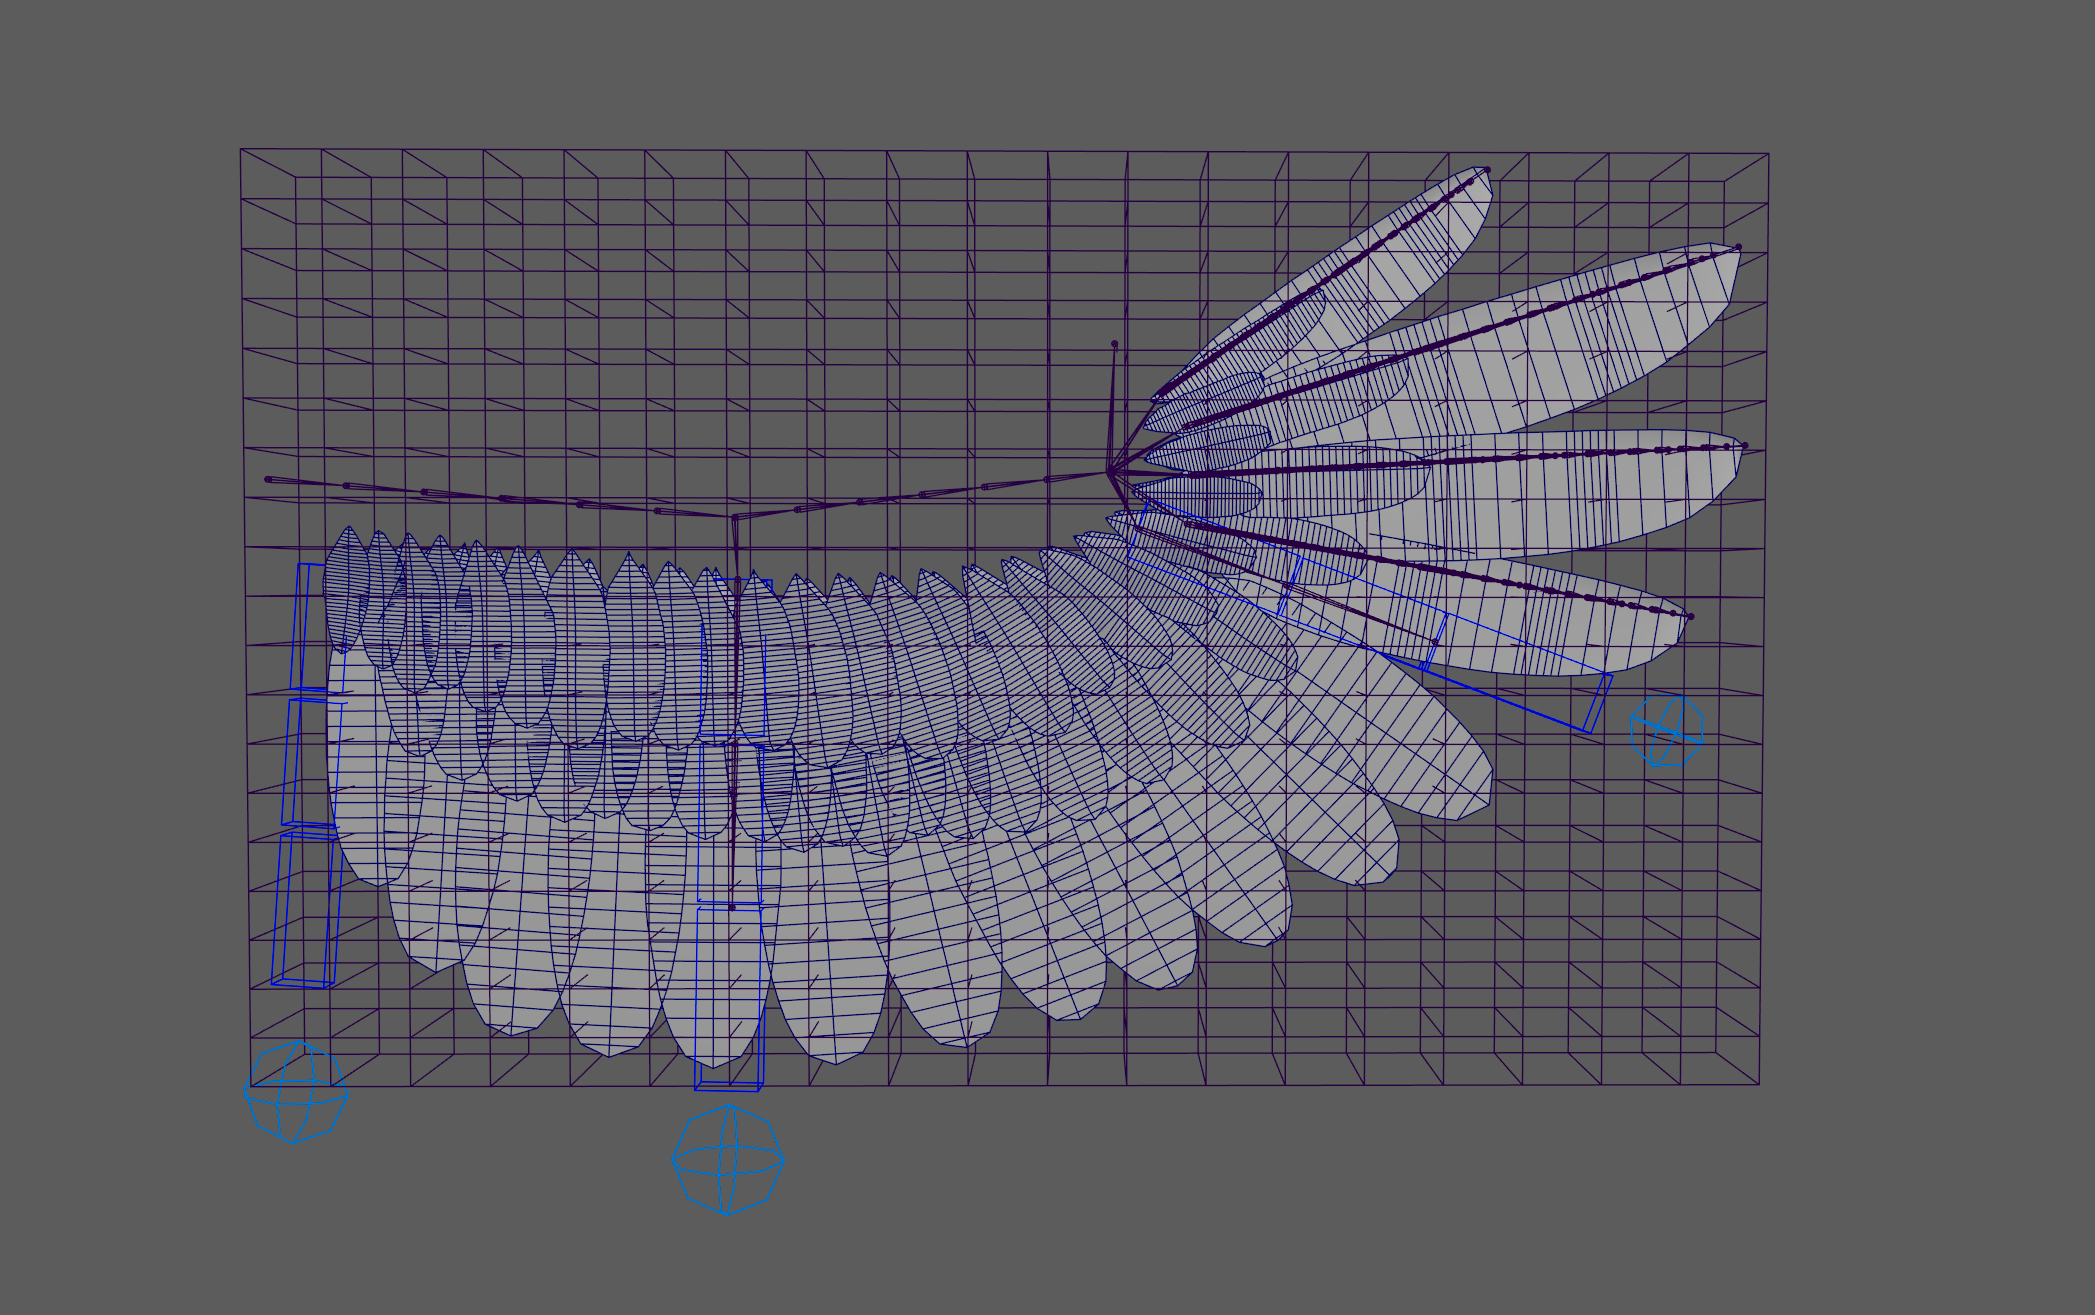
A disadvantage however is that the feather cards can stretch or squash too much, but this is something we will fix later. Let’s get started on the lattice.
First, we create a duplicate of the original body mesh and also the feather mesh. These are the meshes that the lattice drives behind the scenes and we will eventually blendshape to the final mesh (output mesh).
Then we build the joint rig on top of a simplified plane, which is skinned to the arm-, wing-and finger joints. If you are looking to automate the process when rebuilding (mgear/kangaroo/other tools), you can save the faces of the main body on which the lattice should be created in a JSON file. That allows a script to create a lattice with the correct size. Use the saved faces and the feather geo to create the lattice on.
Lastly, skin the lattice to the same joints as the plane and copy the skin weights from the plane to the lattice. We now have a lattice that moves all feathers and the arm. Since it is skinned to the joints, it moves with the rig.
.png)
Blendshape and skin
The fingers are skinned to the main finger joints. In our case, because the finger geo is in the same merged mesh as the other feathers, we need make another duplicate mesh from the feathers, call it ‘skin mesh’ . We use NGSkinTools2 to quickly assign base weights per joint and do a manual pass afterwards.
.png)
We then create a blendshape to the original (output) mesh. We have two targets coming together on the output blendshape at this point. A lattice target (from the lattice mesh) and a skin target (from the skin mesh). Which we separate by excluding one of them in the weight paint and inverting that map onto the second. Something that is easy to do with the SHAPES plugin. This prevents all double transforms. For our setup the skinning is applied on the fingers and the lattice on all other feathers.
In SHAPES use the following sequence of buttons:
- copy weightmap (first target)
- past weightmap (second target)
- invert weightmap (second target)
.png)
.png)
Finger spread
Since we excluded the fingers from the lattice, we still need to create separate logic to spread them nicely between a new ‘spread’ controller and the regular feathers, which are in the lattice. You could use driven keys to achieve this, but since we already have the spread painted in the lattice plane, we will use a different solution.
We can add a curve to the rig. This curve is extracted from the outer edge of our plane and skinned the same way as the lattice. We then attach one locater per finger to this curve. Each finger chain is aimconstrained to its respective locator. When we move our finger spread controller, it moves the lattice with the same skinning we applied on the plane. Now it also moves the curve. Meaning that the locators will spread out the way our skinned plane spreads out. So we mimic the lattice behavior on our fingers, without stretching them and maintaining their extra skinned functionality on top.
.png)
Correctives
To prevent the lattice from stretching the feather cards too much, we compensate the movements with an list of corrective blendshapes. We can create these shapes by making an automated rig setup script that separates the feathers, skins them to a joint placed at the base, merges the skinned meshes and transfers the original vertex order to the newly created mesh. With this setup, we can quickly pose all feathers. For us, this way worked best:
- Create the feather corrective setup as described above, below is a simple script that generates the setup on selected meshes
"""Auto Feather Rigger.

Creates a joint for each feather in a merged mesh and skins them to it.

Pipeline:
    1. Separate mesh per feather.
    2. Place joints at the nearest surface point to locator1.
    3. Skin each feather to its joint.
    4. Merge all skinned meshes with polyUniteSkinned.
    5. Copy skin weights back to the original mesh (preserves point order).
    6. Clean up temporary nodes.

Usage:
    Create a locator1 and position it above the feathers, select the
    mesh(es), then run this script.

Author:
    Arnout Meysman
"""

import maya.cmds as cmds


# ---------------------------------------------------------------------------
# Helpers
# ---------------------------------------------------------------------------

def _get_locator_position(locator="locator1"):
    """Returns the world-space position of a locator.

    Args:
        locator: Name of the locator node to query.

    Returns:
        A tuple (x, y, z) of world-space float coordinates.
    """
    x = cmds.getAttr(f"{locator}.translateX")
    y = cmds.getAttr(f"{locator}.translateY")
    z = cmds.getAttr(f"{locator}.translateZ")
    return x, y, z


def _closest_point_on_mesh(mesh, position):
    """Returns the closest surface point on a mesh to a given position.

    Args:
        mesh: Transform node name of the target mesh.
        position: World-space (x, y, z) query position.

    Returns:
        A tuple (x, y, z) of the closest world-space position on
        the mesh surface.
    """
    mesh_shape = cmds.listRelatives(mesh, shapes=True)[0]

    cpm = cmds.createNode(
        "closestPointOnMesh", name="temp_closestPointOnMesh"
    )
    cmds.connectAttr(f"{mesh_shape}.outMesh", f"{cpm}.inMesh", force=True)
    cmds.setAttr(f"{cpm}.inPosition", *position, type="double3")

    result = (
        cmds.getAttr(f"{cpm}.result.position.positionX"),
        cmds.getAttr(f"{cpm}.result.position.positionY"),
        cmds.getAttr(f"{cpm}.result.position.positionZ"),
    )

    cmds.delete(cpm)
    return result


# ---------------------------------------------------------------------------
# Core
# ---------------------------------------------------------------------------

def create_joint_on_closest(mesh, parent_group):
    """Places a joint at the closest surface point to locator1 and skins it.

    Creates an offset group at the closest point on the mesh surface to
    locator1, places a joint inside it, and binds the mesh to that joint.

    Args:
        mesh: Feather mesh transform to process.
        parent_group: Group node that will hold the offset/joint hierarchy.
    """
    pos = _closest_point_on_mesh(mesh, _get_locator_position())

    cmds.select(parent_group)
    joint = cmds.joint()
    offset = cmds.group(joint, name=f"{mesh}_offset")

    cmds.setAttr(f"{offset}.translateX", pos[0])
    cmds.setAttr(f"{offset}.translateY", pos[1])
    cmds.setAttr(f"{offset}.translateZ", pos[2])

    cmds.skinCluster(joint, mesh)


def rig_feather_mesh(original_mesh):
    """Runs the full feather-rigging pipeline on a merged mesh.

    Duplicates and separates the mesh into individual feathers, creates
    a joint for each one, merges the skinned results, copies the weights
    back to the original mesh, then deletes all temporary geometry.

    Args:
        original_mesh: Name of the merged feather mesh to rig.
    """
    duplicate = cmds.duplicate(original_mesh)[0]
    splits = cmds.polySeparate(duplicate)
    splits.pop()  # polySeparate appends the original; discard it

    group_name = f"{original_mesh}_GRUP"
    if not cmds.objExists(group_name):
        cmds.group(empty=True, name=group_name)

    for feather in splits:
        create_joint_on_closest(feather, group_name)

    combined_mesh = cmds.polyUniteSkinned(
        splits, constructionHistory=True, mergeUVSets=True
    )[0]

    offsets = cmds.listRelatives(group_name, children=True)
    joints = cmds.listRelatives(offsets, children=True)

    cmds.skinCluster(joints, original_mesh)
    cmds.copySkinWeights(
        combined_mesh,
        original_mesh,
        surfaceAssociation="closestPoint",
        noMirror=True,
        uvSpace=("map1", "map1"),
        influenceAssociation="oneToOne",
    )

    cmds.delete([duplicate, combined_mesh])


# ---------------------------------------------------------------------------
# Entry point
# ---------------------------------------------------------------------------

def main():
    """Processes every selected mesh through the feather-rigging pipeline."""
    selected = cmds.ls(selection=True)
    if not selected:
        cmds.warning(
            "No meshes selected. Select feather mesh(es) and re-run."
        )
        return

    for mesh in selected:
        rig_feather_mesh(mesh)


main()- Put the original meshes in a layer and only make the wireframes visible as reference for your correctives
- Enable a problem pose through animation library on the original mesh
- Use the joints to rotate the feathers so they match the problem pose, the center line of the original feathers (that the lattice stretches) acts as a guide to rotate the corrective feathers to
- When the new shape looks good, duplicate the mesh and rename it
- Do this for every problem pose.
The process is sped up a lot by using the SHAPES plugin here to create automatic deltas from your created shapes. It is easy to quickly edit blendshapes and connect to the right drivers. We use a combination of the vector weight drivers, driven keys and some combo shapes to get the right results.
.png)
.png)
Extra Shape tips:
- Make sure while working with SHAPES in this way that you enable ‘Keep Selected Mesh’ when adding the shapes. This is handy to troubleshoot later or edit broken blendshapes.
.png)
- You can easily edit the targets by enabling them and pressing the edit button.
.png)
This puts you in an editing mode where you are free to modify the mesh, even blendshape it. The final result is the only thing that gets saved. Since we still have meshes in the scene, we can use them to quickly blendshape them to the editable target while in this mode. Below an example of a small snippet to quickly blendshape your new shape to the existing editable target.
When you are done press the red button to exit the editing mode.
.png)
Fly mode
We can create a 4th mesh (we have a lattice mesh, skin mesh and output mesh already), we call this the fly mesh. This one has FK chains to enable dynamics with the mGear spring node on the fingers. This gives us an alternative to have smooth automatic bending fingers when the birds need to fly.
.png)
The FK chains have a lot of joints for smooth bending and one controller driving each 3 joints for faster animation. This is also blendshaped to the output mesh. Via a switch, we can enable/disable the finger targets we choose: acting (from the skin mesh) or flying (from the fly mesh).
Wrapping up
Something that the lattice can cause when moving in combination with skinning and blendshapes is ugly deformations which are quite unpredictable. A solution for this is moving the lattice base together with the shoulder of the wing. Since this will cause the mesh to stay in place now, we can constrain it to move with the shoulder again. Now we have full range movement of the shoulder and lattice deformation on the feathers without unpredictable deformations.
Most of this setup can and should be automated by script. We used mGear to rebuild our rigs, relying heavily on custom scripts that it runs before and after the build.