.svg)
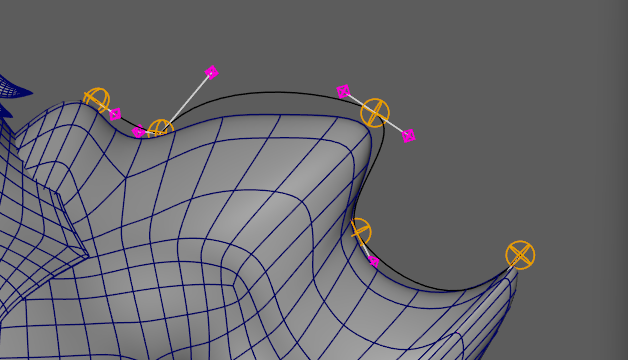

GG CurveDeform - User Guide
1. Requirements
Autodesk Maya 2024, 2025, 2026, or 2027, on Windows.
There are no other dependencies - the installer is self-contained. The Qt side is handled automatically: the tool uses PySide6 on Maya 2025 and newer, and falls back to PySide2 on Maya 2024.
The download contains a separate build for each Maya version. The installer picks the one matching the Maya you drag it into, so you don't have to choose.
2. Install
1. Extract the zip completely. Don't run the installer from inside the archive.
2. Drag install.py from the extracted CurveDeformFree folder into a Maya viewport.
3. A dialog confirms "CurveDeformFree installed" and reports the module folder and Maya version.
The installer copies the tool to Documents/maya/modules/CurveDeformFree and writes CurveDeformFree.mod beside it. It adds a CurveDeform button to your current shelf - whichever shelf tab is active when you drag. It copies the icon to Documents/maya/prefs/icons/CurveDeform.png, and installs a Bifrost compound to ~/Autodesk/Bifrost/Compounds/CurveDeformWire/.
Warning: If your Maya version isn't in the download, the installer refuses with "This CurveDeformFree installer does not include a build for Maya XXXX. Available builds: ...". That's the installer protecting you - a mismatched build won't load.
Re-running the installer is safe. It replaces the module folder and adds a fresh shelf button.
To uninstall: close Maya, then delete Documents/maya/modules/CurveDeformFree and CurveDeformFree.mod. Optionally remove the shelf button, the icon, and the Bifrost compound folder.
3. Launch
Click the CurveDeform shelf button.
A dockable panel titled "CurveDeform Tool" opens - floating by default, and dockable to the right. Drag it into your workspace if you want it docked.
4. The Interface
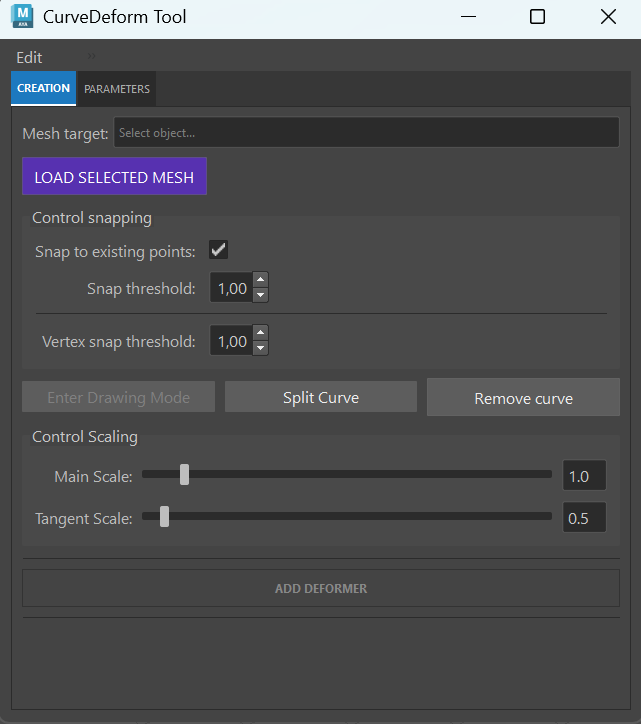
The panel has two tabs. CREATION is where you load a mesh, draw and edit curves, and build the rig. PARAMETERS is where you tune and manage every rig in the scene.
A small menu bar sits at the top-left of the panel with Edit and Tools.
5. Building Your First Rig
5.1 Load a mesh
Select a polygon mesh and click "LOAD SELECTED MESH".
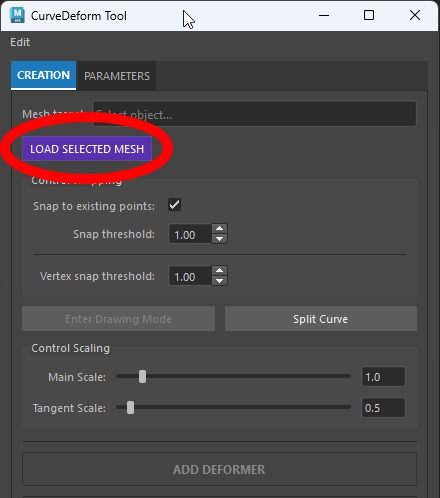
The status label next to the button tells you what happened. "Mesh loaded successfully." in green means you're good, and the mesh name fills the Mesh target field. "Error: Selected object is not a valid mesh." in red means your selection isn't a polygon mesh - NURBS and subdivs are not supported. "Nothing selected." means nothing was selected when you pressed the button.
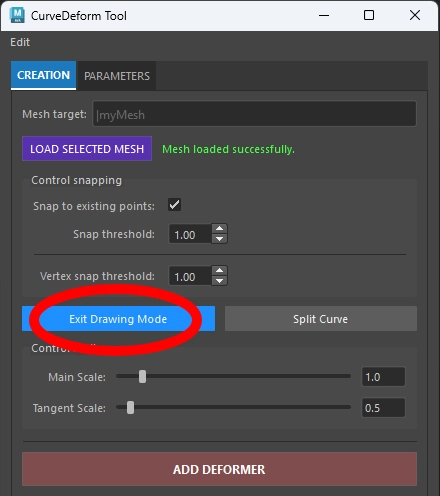
Note: Loading a mesh drops you straight into Drawing Mode. On success the tool auto-enables drawing - the button turns blue and reads "Exit Drawing Mode". That's expected, not a misclick.
5.2 Draw a curve
With Drawing Mode active, work directly on the mesh with the left mouse button:
- Click - drops a main control on the surface under the cursor.
- Click-drag - slides the point along the surface before you commit. A preview locator follows the mesh like a marker.
- Release - locks the control in place. The next click starts the next segment.
Each pair of consecutive clicks creates one curve segment. Two small tangent controls are generated automatically per segment and aligned to the surface, so drawn curves hug the model instead of cutting through it.
Warning: A single click makes no curve. You need at least two points before there's anything to build a rig from.
Warning: Exiting Drawing Mode breaks the chain. When you leave and re-enter Drawing Mode, the next click starts a new, disconnected curve rather than continuing the previous one. To extend an existing chain, snap onto its end control (below).
Click "Exit Drawing Mode" to stop.
Note: Drawing Mode also exits on its own if you minimise the panel or switch Maya workspace tabs. If clicks stop registering, check whether the button still says "Exit Drawing Mode".
5.3 Snapping - the "Control snapping" group
"Snap to existing points" is on by default. When the cursor comes within the Snap threshold of an existing main control, the new point welds onto it instead of creating a duplicate. This is how you build connected networks: shared endpoints are what turn separate segments into a wireframe, and what lets you ring an area with a closed shape.
Snap threshold (default 1.00, range 0.01 to 10.00) sets the distance for the above.
Vertex snap threshold (default 1.00, range 0.01 to 10.00) sets the distance for snapping onto mesh vertices.
Warning: Vertex snapping only works when Maya's own point-snap is enabled - hold V or toggle point snapping on the status line. The threshold field alone does nothing. This trips up most first-time users.
5.4 Control Scaling
.png)
Main Scale (default 1.0) and Tangent Scale (default 0.5) set the visual size of controls you're about to create. Both range from 0.1 to 10.0.
Note: These only affect new controls, and only how big the icons look - they have no effect on the deformation. To resize controls that already exist, use Tools > Rescale controls.
5.5 Split a curve
1. Select exactly one curve in the viewport.
2. Click "Split Curve" - it turns green and reads "Confirm Split", and a sphere plus a locator appear on the curve.
3. Drag the locator to slide the sphere to where you want the split.
4. Click "Confirm Split".
The curve becomes two segments joined by a new shared control.
Warning: If the button snaps back to "Split Curve" immediately, your selection wasn't a single curve. Select one curve - not a control, not two curves.
Warning: Split before you build. Splitting a curve that already has a deformer on it deletes and rebuilds that curve out from under the wire. Do your splitting before "ADD DEFORMER".
5.6 Remove a curve
Select a curve and click "Remove curve". The curve, its tangent controls, its clusters and its guides are deleted together.
Note: Shared controls survive. A main control used by two curves (a junction) is kept when you remove one of them, so removing a segment doesn't unravel the chain.
5.7 Build the rig
Click "ADD DEFORMER".
.png)
Warning: ADD DEFORMER is silent if there's nothing to build. With no curves drawn, the button does nothing and reports nothing. If it seems dead, check that you actually have at least one curve.
Warning: Don't press it twice on the same curves. Every curve is already wired, so the second press throws "Error during deformer creation:" in the Script Editor. Draw new curves first - see section 8, Layering Multiple Rigs.
After the build, your curves are locked. They become reference-display (unselectable) and their transforms are locked. From here you shape the rig through the controls, not by editing the curves directly.
6. What the Tool Builds in Your Scene
Read this section once. It explains the one thing that surprises everybody.
Your original mesh gets hidden
On the first build, the tool duplicates your mesh as CD_{mesh}_MASTER_BRIDGE, blendshapes the original into it, applies the wire deformer to the duplicate, and hides the original.
What you see and render from then on is the bridge. This isn't a bug - the curves and controls read positions from the original mesh, so deforming it directly would create an evaluation cycle. The bridge breaks the cycle.
Note: Your original comes back automatically when you delete the last rig on it.
The Outliner
Everything lives under a top-level group called CurveDeforms.
- CurveDeforms_DATA - the root data node. It indexes every rig in the scene. Do not delete.
- CD_1, CD_2, and so on - one group per rig. This is where the animatable attributes live.
- CD_1_DATA - that rig's own index.
- CD_{mesh}_MASTER_BRIDGE - the visible, deformed duplicate of your mesh.
- bs_MASTER_{mesh} - the blendshape feeding your original into the bridge.
- CD_1_wire_{mesh}_01 - the actual Maya wire deformer.
- CD_CTRL_1, CD_CTRL_2, and so on - the main controls. This is what animators grab.
- CD_tan_cv1_CTRL_# and CD_tan_cv2_CTRL_# - tangent controls. They shape a span without moving its endpoints, and are translate-only.
Each rig also carries five sub-groups: CD_1_follicles, CD_1_controls, CD_1_visual_guides, CD_1_curve_clusters and CD_1_curves. Follicles and clusters are hidden and unselectable on purpose.
Important: CurveDeforms_DATA is the brain. Don't delete it. The deformation itself keeps working without it - it's ordinary Maya nodes - but the panel goes blank, you permanently lose the ability to tune or delete existing rigs from the tool, and you won't be able to create new rigs on that mesh either. There's no recovery from the UI.
Note: Don't rename the generated nodes. Split, reload and the base-wire setup all identify nodes by name convention (_cv0_ through _cv3_, CD_CTRL, CD_tan). Renaming silently breaks them.
7. The PARAMETERS Tab
You get one block per rig, titled with the wire node's name. If the scene has no rigs, you'll see "No targeted wire deformers in list."
.png)
The three animatable attributes
They live on the CD_n group transform, they're keyable, and they all default to 1.0:
Global Envelope (slider 0.00 to 1.00) is the master strength for that rig. 0 is off, 1 is full.
Dropoff Influence (slider 0.00 to 10.00) is the radius of influence in world units - how far from the curve the mesh reacts.
Scale (slider 0.00 to 10.00) is the cross-sectional scaling of the affected region around the curve.
Notes:
- Dropoff is one radius for the whole rig, not a per-curve value and not a profile. If you need different falloffs in different places, build them as separate rigs.
- The sliders clamp to the ranges above, but the underlying attributes have no maximum. If you need to push past the slider, type into the Channel Box on the CD_n group.
- Dragging a slider is one undo step.
Visibility row
ALL shows or hides every control in the rig. Tangents does the same for just the tangent controls. Guides (on by default) toggles the thin guide lines. Draw always on top (off by default) draws controls in front of the mesh.
These are viewport toggles, not keyable through the panel.
Deleting a rig
.png)
Click the small trash icon at the top-right of a rig's block. You get a confirmation dialog titled "Confirm Deletion", reading "Are you sure you want to delete 'CD_1_wire_head_01' and its entire rig network?" with Yes and No.
This removes the wire, the whole CD_n group, its controls and its curves. If it was the last rig on that mesh, the bridge is deleted and your original mesh is unhidden.
8. Layering Multiple Rigs
Multiple rigs on one mesh are fully supported, and the workflow is a natural loop: draw, ADD DEFORMER, draw again, ADD DEFORMER again.
After each build the tool clears the active network, so the next point you draw starts a fresh CD_2, CD_3, and so on. A face can carry a brow rig, a mouth rig, and a cheek rig at once. Each gets its own controls, its own three attributes, and its own block in the PARAMETERS tab.
Note: They stack, they don't isolate. Every rig on a mesh feeds the same CD_{mesh}_MASTER_BRIDGE, in build order - so a later rig deforms the result of the earlier ones. Independent controls and independent tuning, shared evaluation chain. Build coarse first, refinement second.
9. Preferences
.png)
Open Edit > Preferences.
Create Animation Layer (off by default). When on, each ADD DEFORMER also creates an override animation layer named {mesh}_{CD_n}_anim_lyr containing only that rig's controls - so the new deformation is keyable in isolation and your base pose stays clean.
Use Bifrost (off by default) reveals an experimental "ADD BIFROST DEFORMER" button. Leave this off - see the note below.
Click "Save Preferences" to keep changes. Closing the dialog with the X discards them - there's no Cancel button. Preferences persist across Maya sessions.
Warning: "Use Bifrost" needs a tool restart to take effect. Saving the preference doesn't show or hide the button until the CurveDeform window is rebuilt.
Important: The Bifrost path is experimental and not supported. It's a separate code path from the normal deformer: it doesn't register in the CurveDeforms network, creates no envelope/dropoff/scale attributes, never appears in the PARAMETERS tab, can't be deleted from the panel, and converts your bezier curves to NURBS in place with no undo. Everything else in this guide describes the standard ADD DEFORMER path.
10. Tools Menu
.png)
"Controls to spheres" swaps control shapes for shaded NURBS spheres - orange for main, magenta for tangents. Easier to see and grab in heavy scenes. "Spheres to controls" is the reverse. Both preserve the transform node, so animation, keys and constraints survive.
"Rescale controls > All / Only main / Only tangents" resizes existing controls using the current Main/Tangent Scale sliders. It rebuilds the control shape at an absolute size rather than scaling the transform - so it also preserves animation.
.png)
If the scene has more than one rig, a "Select Networks to Rescale" dialog appears, reading "Multiple networks detected. Select targets:" with an ALL / None pair and an "Apply Rescale" button. With only one rig it applies immediately.
Warning: Rescale matches network names by substring. Selecting CD_1 will also catch CD_10, CD_11, and so on. Only relevant once you have ten or more rigs in a scene.
11. Saving and Reopening Scenes
The rig is made of ordinary Maya nodes - wire, cluster, follicle, blendShape, bezier curves. Maya saves and reloads them like any hand-built rig. Nothing needs rebuilding, and the deformation works on scene open whether or not you ever launch the tool.
What does need restoring is the panel. It repopulates from CurveDeforms_DATA when the tool window opens.
Warning: If the panel is already open when you open a scene, it will not repopulate. There's no scene-open callback. Close the CurveDeform window and reopen it from the shelf and your rigs will appear in PARAMETERS.
12. Troubleshooting
Shelf button does nothing: The install didn't complete:
Re-drag install.py from the extracted folder.
Installer refuses with "does not include a build for Maya XXXX":
Your Maya version isn't in this package. Get the build that covers it.
"Error: Selected object is not a valid mesh":
Your selection isn't a polygon mesh. NURBS and subdivs aren't supported.
Clicking the mesh does nothing:
You're not in Drawing Mode - the button should read "Exit Drawing Mode". Minimising the panel or switching workspace tabs silently exits it.
Vertex snapping ignores my threshold:
Maya's own point-snap isn't on. Hold V or enable point snapping on the status line.
New clicks start a new curve instead of continuing:
You left and re-entered Drawing Mode, which breaks the chain. Snap onto the existing end control to continue it.
ADD DEFORMER does nothing and reports nothing:
No curves are drawn. One lone click isn't a curve - you need at least two points.
"Error during deformer creation:" in the Script Editor:
ADD DEFORMER was pressed twice on curves that are already wired. Draw new curves for a new rig.
Split Curve un-arms itself immediately:
Your selection wasn't exactly one curve.
My model vanished after building:
Expected: your original is hidden and replaced by CD_{mesh}_MASTER_BRIDGE. It returns when the last rig is deleted.
Curves won't select after building:
Post-build they're reference-display and locked. Use the controls.
PARAMETERS is empty after opening a scene:
The panel was already open. Close and reopen the CurveDeform window.
A rig block shows "Network Node Not Found":
The wire lost its link to its CD_n group - usually from renaming or deleting nodes.
Panel is blank and new rigs won't build:
CurveDeforms_DATA was deleted. This isn't recoverable from the UI.
Two characters' rigs collide:
Two meshes with the same short name in different namespaces share a bridge. Give them distinct short names before rigging.
Reporting a bug:
include your Maya version and the build ID. After a full Maya restart (compiled modules don't hot-reload), run this in the Script Editor:
from curve_deform import ui
print(ui.__build_id__)
13. Known Limits
- Polygon meshes only.
- One dropoff radius per rig - no per-curve falloff, no painted weights, no falloff profile from the panel.
- Curves are segments, not loops. Every curve is a span between two controls. You build a closed shape by snapping segments end to end - there's no single closed curve.
- Curves aren't editable after the build. Shape through the controls.
- Tangent controls are translate-only.
- Wire twist is disabled.
- Don't rename generated nodes - the tool finds them by name.
- Layered rigs share one bridge and evaluate in build order.
14. Credits
- Author: Gimbal Goats
- Contributors: Matteo Barison LinkedIn, Gimbal Goats LinkedIn
15. Get CurveDeform
Issues? Contact us here: info@gimbalgoats.com